
Setting up and Using a Multi-SyncBack Touch Profile
Author: Kostas Tsakiridis, 2BrightSparks Pte. Ltd.
With SyncBackPro it is possible to connect multiple SyncBack Touch instances running on different devices and operating systems using a single profile. This feature is useful in cases where we want to perform the same functionality and set of rules against multiple devices without having to setup separate profiles for each one of them. An example would be having to backup content from let's say hundreds of devices in an organization. Defining that many separate profiles would be time consuming and the same goes for maintaining or updating them. Using a single Multi-SyncBack Touch profile allows us to do this easily and quickly.
NOTE: This article assumes that the user already knows how to configure and use SyncBack Touch on various devices and tested their connectivity.
Prerequisites
SyncBack Touch must be installed in advance on all related devices that the user intends to access with this type of profile. For Windows devices, the user needs to mark down which devices will be running using user impersonation with SyncBack Touch because for those the Windows username and password will have to be entered manually during the profile setup.
SyncBackPro can find instances of SyncBack Touch running on the local network, but it cannot automatically locate any running instances on a different network subnet or on the Internet. For those the user needs to manually enter their hostnames/IP addresses and port number.
SyncBack Touch Paths and Variables
In some use case scenarios the user may want to backup content from (or to) multiple SyncBack Touch instances under a fixed path. For example, the user has a dozen of Windows PC's running SyncBack Touch and all of them contain similar data under the same folder name on drive C:, e.g. C:\MyAppData, which the user wants to backup to a central location.
In this case the profile's Source folder would be set as \C\MyAppData\ (notice the lack of colon after the drive letter) and the destination can be on a local or network drive. In order to differentiate the data from each computer, the destination path should include the built-in variable that defines each SyncBack Touch hostname so each computer's data will be saved under its own sub-folder, e.g. C:\Backup\%SBTNAME%\
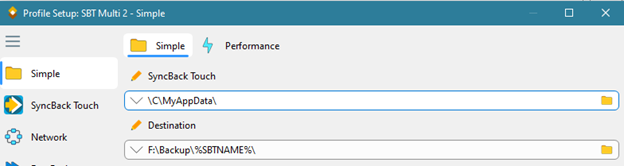
%SBTNAME% is a built-in variable that will be replaced with the name (or IP address) of the SyncBack Touch being accessed during profile run. For information on variables the user may read more in SyncBackPro's help file under the Variables section. More than one variable can be inserted in the paths as well, for example if the user wants to create backup folders identified by the current date under each computer name.
Now, in case the content on each computer exists under different folders, for example user specific content that exists under user defined folders so each computer source folder structure is different, then in this case the user can again rely on variables to help with defining the paths. In this scenario the user needs to define system environment variables on each computer, using the same name for each variable, and have the variables contain the path on the computer. For example, assume we use a variable named MY_TOUCH_PATH.
- Data on computer ABC is under folder C:\UserData so the variable MY_TOUCH_PATH should be set to C:\UserData\
- Data on computer ACME is under folder D:\Data\Accounts so the variable MY_TOUCH_PATH should be set to D:\Data\Accounts\
The same applies for computers running SyncBack Touch on Linux or macOS. The variable should be set to the corresponding paths for these operating systems.
When configuring the source/destination paths in SyncBackPro, the custom variable should be prefixed with SBT_ENV_ (notice the underscore character at the end) so for the above example it should become %SBT_ENV_MY_TOUCH_PATH%
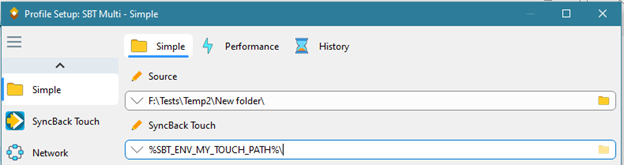
During profile execution the variable will be evaluated by every SyncBack Touch instance that is included in the profile so SyncBackPro can request the contents from those remote folders.
Setting up the Profile
In this section, we will show how to setup a multi-SyncBack Touch profile. We don't suggest creating directly such a profile but it's better creating a standard/single device SyncBack Touch profile first in order to make sure everything is working as expected before expanding it to a multi-SyncBack Touch profile. If there is no such profile available then create one first.
NOTE: Some features are not available when setting up a multi-SyncBack Touch profile, for example, Fast Backup, Integrity Check and Folder/Files selection (on SyncBack Touch side).
Once the profile has been setup and verified then it can be become a multi-SyncBack Touch profile. To do so, edit the profile and under the SyncBack Touch options page click the SyncBack Touch (Multi) tab and check the "I want to use multiple SyncBack Touch devices" check-box. The window should look like the following:
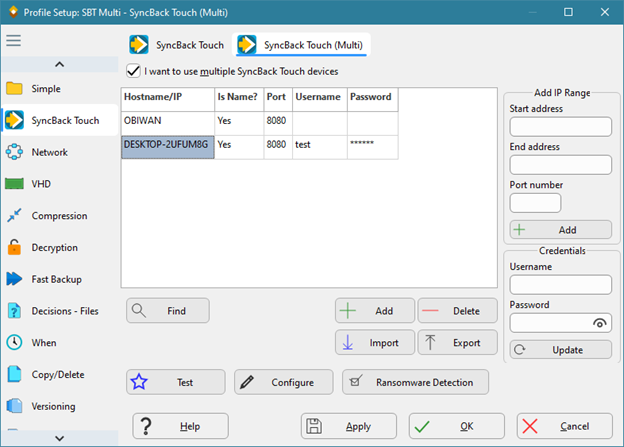
The list columns are:
- Hostname/IP: The hostname, IP address or device name of the SyncBack Touch device.
- Is Name?: If Yes, then the Hostname/IP refers the name of the SyncBack Touch device, otherwise it is the hostname or IP address of the device.
- Port: The port number (default is 8080) of the SyncBack Touch device. If you are connecting using the name then this value is ignored.
- Username: This is only required if the SyncBack Touch device is configured to verify usernames and passwords with an SBMS server or if SyncBack Touch is running in impersonation mode on a Windows computer. By default no password is required by SyncBack Touch.
- Password: This is only required if the SyncBack Touch device is configured to verify usernames and passwords with an SBMS server, or if SyncBack Touch is running in impersonation mode on a Windows computer or has been configured to require a password. By default no password is required by SyncBack Touch.
To change the username and password for a range of devices, enter the Username and Password in the Credentials box. Next, select the items in the list (use the SHIFT key and arrow keys). Finally, click the Update button to change the credentials for the selected devices.
There are a number of ways to add a SyncBack Touch device to the list:
- Press the Insert key to insert a new row into to the list.
- Click the Add button to add a new row to the list.
- Click the Import button to import a list of devices (see below for the file format).
- Click the Find button to scan the local network to find SyncBack Touch devices and add them to the list automatically.
- In the Add IP Range box, enter a starting IP address, ending IP address and the port number (default is 8080) then click the Add button.
Importing a list of devices from a comma-delimited file (CSV) is also possible by clicking the Import button. More information on the format of the file is available in SyncBackPro's help file.
Ransomware Detection
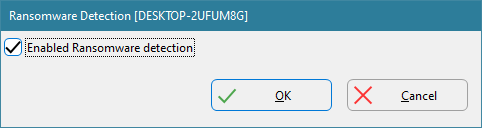
To configure SyncBack Touch to detect Ransomware on all the devices it is installed and running on, click the Ransomware Detection button. Enable or disable the check- "Enabled Ransomware detection" to switch on or off Ransomware detection on each device. Click the Re-Create button to recreate the Ransomware detection file, e.g., if it has been deleted or changed (and it is not due to Ransomware, for example).
The Ransomware Detection form will appear for every device in the list so the user can repeat the setup for each one of them.
SyncBack Touch will create a Ransomware detection file (an RTF file with a random filename) in the shared documents folder on the device Touch is running on.
The Ransomware detection with Touch is performed at an early stage, just before the source/left and destination/right folders are created.
Testing
The user can test if everything is correct by pressing the Test button. This will attempt to connect and login on every device in the list and will report back any connectivity problems. Issues related to firewall settings are covered in SyncBackPro's help file.
Conclusion
In this article, you have learned about Multi-SyncBack Touch Profiles and how to set them up. Being able to copy to or from multiple SyncBack Touch devices with a single profile is a useful feature, especially for businesses with multiple devices. Those devices do not even need to be on the same local network. Only one copy of SyncBackPro is required, and with SyncBackPro V10, SyncBack Touch is free.