Automate Backups with Windows Task Scheduler in SyncBack
Author: Michael J. Leaver, 2BrightSparks Pte. Ltd.
Profiles in SyncBack can be started automatically by various methods. They can be run automatically via a schedule, periodically, when files are changed, etc. The most common way to have a profile start automatically is via a schedule, e.g. every day at 9am. To achieve this SyncBack leverages the Task Scheduler that is part of Windows.
The first version of the scheduler was included in Windows NT 4.0 (1996) and was then called Scheduled Tasks. The second version, when it became known as the Task Scheduler, was introduced with Windows Vista (2007) and Windows Server 2008. It is this version that is used by SyncBack.
Security
When you schedule a profile in SyncBack, it creates a scheduled task within the Windows Task Scheduler. This scheduled task defines which Windows user account will run the profile, when it is run, how it is run, etc.
Security is important with the scheduler. How a scheduled task can be run is strictly controlled by the access rights your Windows account has along with the elevation level of the process (SyncBack) that is creating the task. This has changed slightly since Windows Vista, so in this article we will only be looking at how it is implemented in Windows 11 (which, at time of writing, is the same as later versions of Windows 10).

When you create a scheduled task in SyncBack there are two ways to have it run by the Windows Task Scheduler:
- Run only when user is logged on: It can be run only when you are logged in. This has no security restrictions and is available to all users.
- Run whether user is logged on or not: It can be run even when you are not logged in. This has security restrictions and is, by default, only available to Windows Administrators.
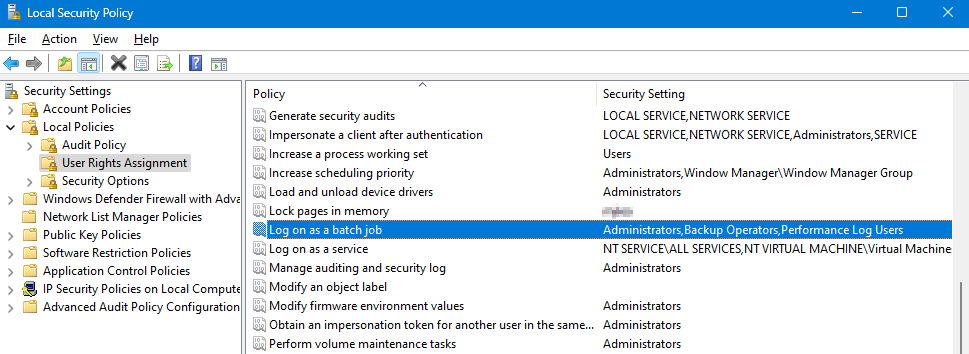
For standard users (non-admin users), only option 1 is available, unless they have been given the "Log on as batch job" access right. This can be given by a Windows Administrator running the Local Security Policy and adding the user to the "Log on as batch job" policy:

Once given this access right, then a standard user can also use option 2 and have schedules run even when they are not logged in. If you were given the access right while SyncBack was running then you will need to restart SyncBack.
When having a schedule run, even when not logged in, you also have the option of not storing your Windows login password in the schedule. This option can only really be used when copying files from one local drive to another, and when neither drive is using any form of encryption. To use this option you must be a Windows Administrator and the process creating the scheduled task (SyncBack) must be elevated. SyncBackFree does not run elevated, but SyncBackPro and SyncBackSE can be run elevated or not elevated.
The "run interactively" option is not supported in Windows 10/11. If a scheduled task is configured to be able to run even when the user is not logged in then it is always run in session 0, which basically means it is run in the background with no user interaction.
Elevated and Non Elevated Tasks
A scheduled task can be configured to run with the highest privileges or not. When SyncBack creates a scheduled task, if the SyncBack process itself is elevated then the scheduled task will be configured to run with the highest privileges. If SyncBack is not run elevated then the scheduled task will not be configured to run with the highest privileges. For example, if you schedule a profile with SyncBackFree, then it will not be configured to run with the highest privileges because SyncBackFree is not run elevated.
When SyncBack is not run elevated you cannot edit, delete or import any schedules that are configured to run with the highest privileges (elevated). This is a security restriction of Windows, i.e. non-elevated processes cannot edit, delete or create elevated scheduled tasks. If SyncBack is run elevated then it can edit or delete any schedules.
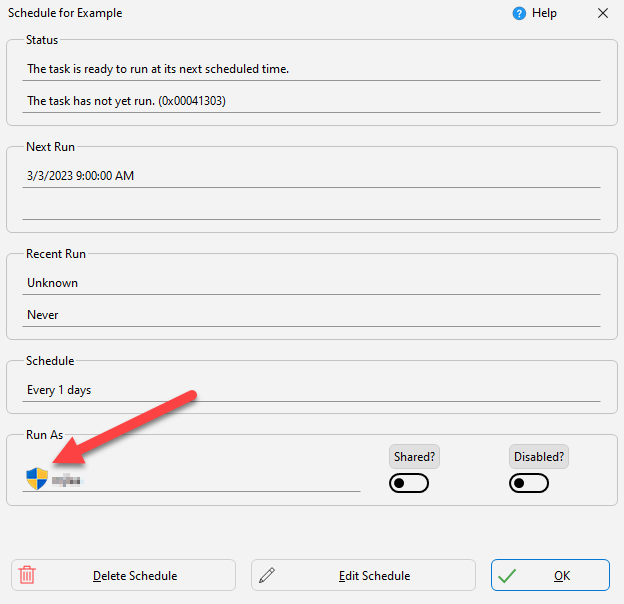
How can you tell if a profile has been scheduled to run elevated? Look for the shield when editing or viewing the profiles schedule. If a shield is shown then it is elevated, otherwise it is not.

Passwords
By default, Windows does not allow schedules to be created by users that do not have a login password. When creating a new schedule, SyncBack will prompt if you want the restriction removed. However, we recommend you instead set a password for your Windows account. If you do not want SyncBack to prompt you to remove the restriction: go to Global Settings and on the Easy page untick the option "Prompt me to remove the blank password restriction on the Windows Scheduler".
When a scheduled task is created, and a password is required, you must provide your Windows login password. You cannot use biometrics, a PIN number, a security key, Windows Hello, etc. It must be your Windows login password. The simple reason for this is that the Windows Task Scheduler requires it and it is not a limitation or restriction of SyncBack. Unsurprisingly, people forget their login password as they often only use other forms of authentication, e.g. Windows Hello. However, the Windows Task Scheduler cannot use Windows Hello, for example, and requires the password for your Windows user account. If you cannot remember your password, and cannot reset it, then the only solution is to configure the schedule to only run when you are logged in.
What happens to scheduled tasks that use your login password and you change your password? You need to edit one of the scheduled tasks and enter your new password: select a scheduled profile in the SyncBack main window, click the Schedule button, click the "Edit Schedule" button then press OK to close the window without making changes. SyncBack will prompt you for your password. Enter your new password and click OK. The Windows Task Scheduler will then automatically update all the other scheduled tasks (using the same Windows account) to use the new password.
SyncBack V11 introduced the Scheduler Monitor Service which can warn you when a schedule has not been run by the Windows Task Scheduler, e.g. because your password has changed. The Scheduler Monitor Service is only installed if you install SyncBack for All Users.
Scheduler Folders
For security and performance reasons, when you create a schedule in SyncBack the schedule is created in a particular folder within the Windows Task Scheduler. The folder is based on the edition of SyncBack (SyncBackFree, SyncBackSE or SyncBackPro), the bitness (32-bit or 64-bit) and your Windows username. This ensures that profiles in different editions of SyncBack do not interfere with each other. For example, you may have SyncBackSE and SyncBackPro installed. It also ensures that different users on the same computer do not see each others schedules. This is important for security reasons.
For example: if your Windows username is Bob and you are using 64-bit SyncBackPro, then all your schedules are stored in the folder \2BrightSparks\SyncBackProx64\Bob\
SyncBack will only look at schedules within that scheduler folder. It will ignore all other schedules. This does not mean the Windows Task Scheduler will not execute those schedules. It means that SyncBack itself will not look at any schedules that are not for the current Windows user, the edition of SyncBack and if it is 32-bit or 64-bit.
Any schedules within the scheduler folder that are not for that edition of SyncBack are ignored (bitness is not relevant). For example, if you put SyncBackFree schedules into the SyncBackPro scheduler folder, they will be ignored. Schedules for other users, within your scheduler folder, are not ignored.
Windows Home
If you are using the Home version of Windows then the main issue is that the administrative tools to enable the "Log on as batch job" right is not available. Microsoft does not include numerous administrative tools in Home versions of Windows. Fortunately, you can get around this using their older software.
Conclusion
The Windows Task Scheduler has various security requirements which SyncBack must adhere to:
- Standard Windows users cannot schedule profiles to run when they are not logged in unless they are given the "Log on as batch job" access right.
- If you do not want the scheduled task to use your Windows login password then you must be a Windows Administrator and also run SyncBack elevated.
- If you do not run SyncBack elevated then you cannot edit or delete profiles that are scheduled to run with the highest privileges. You also cannot import the schedule of a profile if it is set to run with the highest privileges.
- If you change your Windows login password you need to remember to update one of your scheduled profiles to use the new password. All the other schedules are updated automatically to use the new password. SyncBack V11 introduced the Scheduler Monitor Service which can warn you when a schedule has not been run by the Windows Task Scheduler, e.g. because your password has changed.
Noted Customers
© 2003-2026 2BrightSparks Pte. Ltd. | Home | Support | Privacy | Terms | Affiliate Program


