
Restore Data Easily with SyncBack's Backup Recovery Wizard
Author: Swapna Naraharisetty, 2BrightSparks Pte. Ltd.
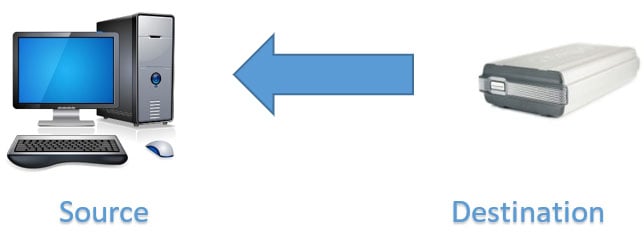
Data restore is the process of copying files from a backup location, e.g. the cloud, to the original (or alternative) location when data is lost or corrupted.
Data restore is needed in situations such as:
- When data is accidentally deleted
- Hardware or software failures
- Malicious attacks – virus, malware, ransomware, etc.
- When data is corrupted due to power outage, human error, natural disasters, theft, or other unplanned events
In this article we will explain the process of restoring a backup and the steps to rollback files to a specific date using SyncBack. For restoring specific versions of files, refer to our How To Restore From Version Files article. We also have an article on Special Restore Cases.
Data Recovery with SyncBack
SyncBack provides a simple restore wizard to easily restore all or selected files from a backup location. Using the restore wizard, you can either restore files to an earlier point in time prior to the corruption or restore all or selected files from a destination backup drive to a source drive.
Note: A restore operation reverses the profile’s source and destination directories (i.e. the source directory becomes the destination directory and destination directory becomes the source directory). That means, the files are copied from the destination to the source in a restore.
Restore Wizard
To restore a backup, you simply need to select the profile and run as a restore. The Restore Wizard will then appear and guide you through the steps required to recover files from a backup drive.
The Restore Wizard has 3 tabs at the top of the window:
Basic
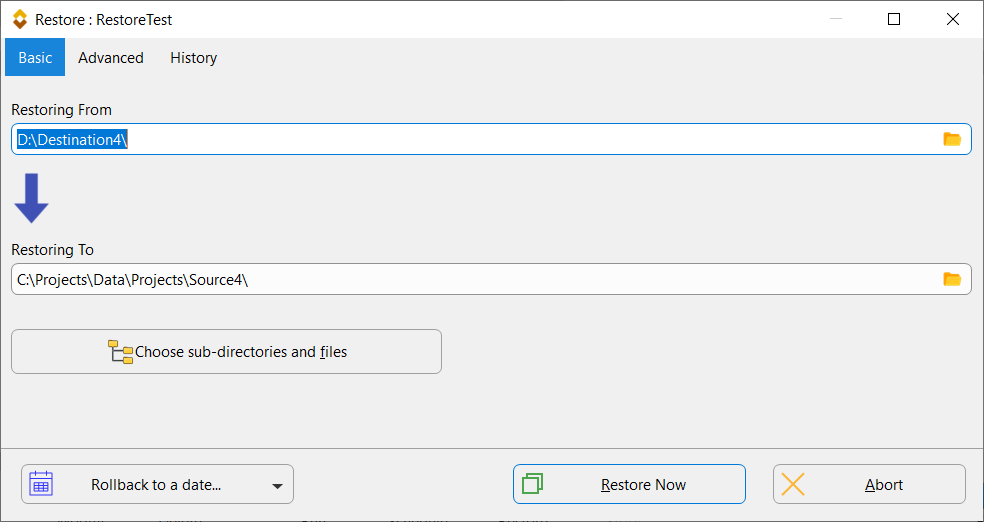
This page allows you to configure the folders you want to restore from and to and set the rollback date & time using the ‘Rollback to a date’ option.
Advanced
Depending on your profile settings, the Advanced page may ask you several questions on how you want to restore files. You can use the default options proposed by SyncBack or change it if needed.
Move File Question: The profile is configured to move files. Would you like to disable file moves during this restore?
If the profile, or one of the profiles in the group, is configured to move files then the above question will be asked. By default, the backup files are not moved when restoring as you probably do not want the backup files to move to source/left so that you have backup files on the backup drive after the restore.
Delete All Files Question: The profile is configured to delete ALL files and folders on Source and/or Destination. Would you like to disable deleting all files during this restore?
If the profile, or one of the profiles in the group, is configured to delete all the files in the source/left and/or destination/right then the above question will be asked. By default, all files are not deleted when restoring as you probably do not want your backup or original files deleted.
Delete Files Question: Profile is configured to delete files from Destination that are not on Source. Would you like to disable file deletion during this restore?
If the profile, or one of the profiles in the group, is configured to delete files that are only in the destination/right then the above question will be asked. By default, files are not deleted when restoring as you probably do not want files only in the source/left to be deleted (as this is a restore the source/left becomes the destination).
Newer Files Question: Profile is configured to allow older files from Source to replace newer files on Destination. Would you like to disable overwriting newer files during this restore?
If the profile, or one of the profiles in the group, is not configured to keep newer files then the above question will be asked. By default, older files are not replaced when restoring as you probably do not want to replace any newer original files with older backup files.
Before/After Programs Question: The profile is configured to execute external programs before and/or after the profile is run. Do you still want to run those external programs?
If the profile, or one of the profiles in the group, is configured to run a program before and/or after the profile, then the above question will be asked. By default, the before and/or after programs are run.
Switching off Selections and Filters Question: Would you like to switch off the selections and filters?
If the profile, or one of the profiles in the group, is configured to use selections or filters then the above question will be asked. By default, the selections and filters are switched off. If you changed the directory to restore from a sub-directory of your destination, then it is strongly advised that you switch off the filters and selections.
Run Group in Reverse Question: Would you like to run the group in reverse? This is may be required in situations where the run order is important, e.g. restoring a Zip file from FTP then restoring from that Zip file.
If you are restoring using a group profile then you will probably want to run it in reverse, i.e. start with the last profile in the group, followed by the second to last profile, etc. until finishing with the first profile in the group. The order the profiles are run in during a restore may be important. For example, you may be using a profile to create a Zip file and then a second profile to upload it to the cloud. These are put into a group. When restoring, you would want to download the Zip file first and then unzip it. By default, groups are run in reverse when restoring.
Ransomware Detection in Source: Would you like to switch off ransomware detection for the location you are restoring to?
If the profile is configured to detect ransomware in the source location, then when restoring you may not have any files yet in the source (because you are going to be restoring them from your destination). This will cause the restore to fail because the lack of a ransomware detection file in the source. By default, ransomware detection in the source is switched off when restoring.
History
Use the History page to view the profile run history.
Steps to Restore Files from an External Drive
Now we will explain the procedure to restore files from an external backup drive. Though an external drive is used for this demonstration, the process is similar when recovering files from network drives, cloud servers, FTP servers, mobile devices, etc.
Step 1: Select the Backup/Mirror profile you want to restore from and click on Restore button at the bottom of SyncBack main window (you may also select Restore from the right-click pop-up menu). If you do not have the profile you could create a new profile in SyncBack. Configure the Destination path to a sub-folder on the external drive to restore from, and Source path to sub-folder on the internal drive to restore to. Then select the profile and click on Restore button.

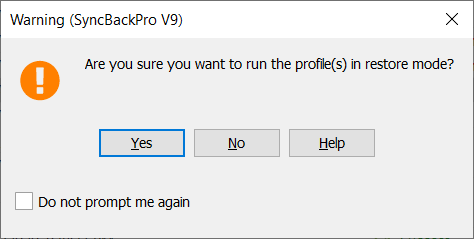
Step 2: The following dialog box appears. Click ‘Yes’ to continue.
Step 3: The Restore wizard will appear.
This gives you a chance to choose a different folder for ‘Restoring From’ and ‘Restoring To’ (if needed). In addition, you can also change the default settings in the Advanced page depending on how you want to restore files (e.g. SyncBack by default skips files only on source/left but you may want to delete files only on the source/left).
If you click the Choose sub-directories and files button then you can choose which files and directories you want to restore. The Differences window will still be displayed later in the restore process, so you can further refine your restore selections or decide not to restore anything.
Step 4: Click on the ‘Restore Now’ button to start the restore process. If you are using SyncBackPro/SE V11, and are running it elevated, then you will be asked if you want to create a Windows System Restore Point. If so, SyncBack will ask Windows to create a restore point. This can be useful for disaster recovery if you are restoring system files and an issue arises during restore.
Step 5: SyncBack will then scan the source and destination to detect file differences. Once done, it will display the Differences Window showing the list of files selected for restore along with their actions (Copy, Move, Delete).
This gives you an opportunity to review the files and optionally change the actions if needed (e.g. a file may be marked for deletion but you may decide not to delete that particular file, then change the Action to Skip).
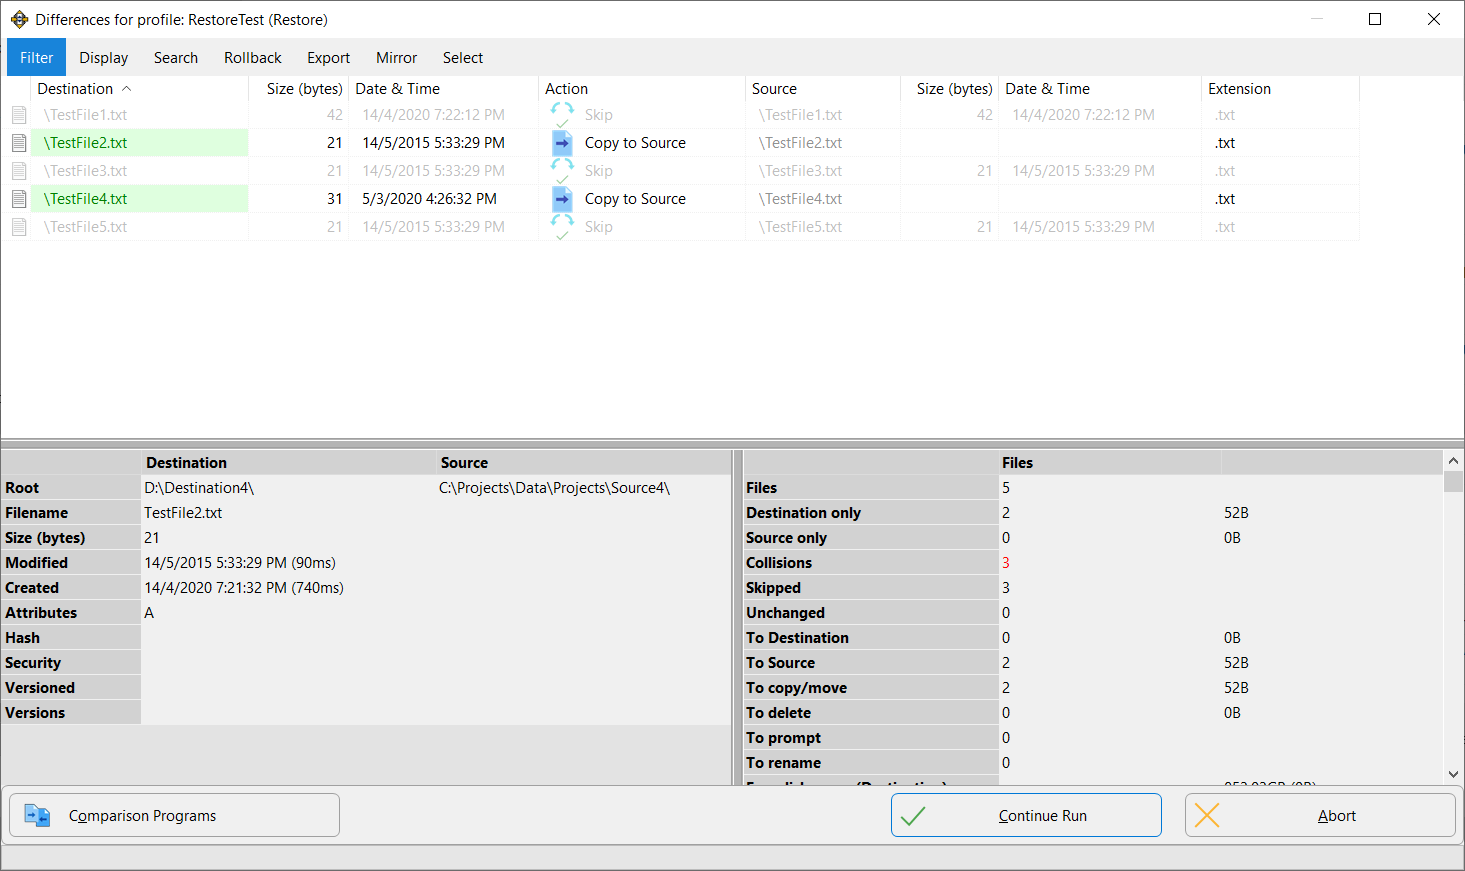
Step 6: After reviewing the Differences Window, you can click on the ‘Continue Run’ button to continue the restore process or click on ‘Abort’ button to stop the restore operation.
Steps to Rollback files to a Specific Date
Next, we will show the process to rollback source/destination files to a specific date.
Step 1: Select the Backup/Mirror profile you want to use for the rollback operation and click on Restore button at the bottom of SyncBack main window (you may also select Restore from right-click pop-up menu).
Step 2: The following dialog box appears. Click ‘Yes’ to continue.
Step 3: The Restore wizard will appear.
Step 4: Configure the rollback date and time using ‘Rollback to a date’ option. You can set the Rollback date & time in two ways:
Set the Rollback date & time manually: Click on ‘Rollback to a date’ and enter the rollback date/time.
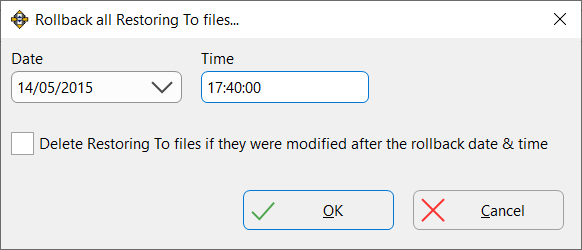
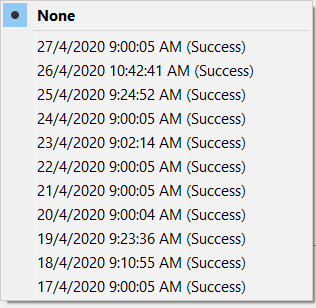
Set the date & time of a previous profile run as the Rollback date & time: Click on dropdown menu next to ‘Rollback to a date’ and simply select the date & time of a previous profile run from the menu.
SyncBack compares Rollback date/time with the modified date/time stamps of destination files and picks the destination files that were last modified closest to rollback date/time for restoring.
Step 5: After configuring rollback date/time, click on the ‘Restore Now’ button. If you are using SyncBackPro/SE V11, and are running it elevated, then you will be asked if you want to create a Windows System Restore Point. If so, SyncBack will ask Windows to create a restore point. This can be useful for disaster recovery if you are restoring system files and an issue arises during restore.
Step 6: The Differences Window will appear showing the list of files selected for rollback with the Action ‘Copy to Source’. If a file is modified after the rollback date/time, then the file is not selected for restore and the Action is set to Skip.
Step 7: Click on the ‘Continue Run’ button to start the rollback process.
Conclusion
Data backup and recovery processes are important to keep your business running smoothly. With SyncBack, you can run fully automated backups frequently and ensure an appropriate strategy is in place to restore data when a disaster happens. Read our Backup Checklist article for more details. Contact Us Today for further details.