Advanced Logging in SyncBackPro
Advanced Logging provides a flexible and powerful way to send profile execution information to external logging systems, including the Windows Event Log, text files, Logstash servers, HTTP REST servers, and Syslog servers.
With this feature, profile execution information can be collected and sent to the configured logging systems, enabling centralised monitoring and analysis of profile activity while making it easier to integrate SyncBack with your existing logging infrastructure.
This article explains how to configure Advanced Logging in SyncBackPro. Advanced Logging is supported only in SyncBackPro. SyncBackSE and SyncBackFree do not include this feature.
Important
Log entries can include the names and paths of the files a profile has copied, deleted, or failed on. Sending them to an external logging system means that anyone with access to that system can see this information, which may reveal sensitive file names, folder structures, or project details. Choose the variables you log, and the logging systems you send them to, with this in mind.
How to configure Advanced Logging
This example shows how to configure the Advanced Logging feature in SyncBackPro to send log data to a Syslog server.
If you do not have a Syslog server, you can download and install our SysLog Freeware, which includes both a Syslog Server and a Syslog Client. The Syslog Server is installed as a Windows service named "2BrightSparks SysLog Server". The Syslog Client application can be used to view messages received by the Syslog Server. After installation, verify that the 2BrightSparks SysLog Server service is running in Windows Services before using it.
Once the Syslog Server is installed and running, follow the steps below to configure Advanced Logging:
1. Navigate to the burger menu  (located at the top-left of the SyncBackPro main window) > Global Settings > Logging Settings page and then click Advanced Logging:

2. On the Advanced Logging settings page, select the desired format for the log information. SyncBackPro supports the following formats:
- JSON
- CSV
- XML
- Text
When the JSON format is selected, SyncBack provides several JSON Advanced Logging variables that can be used to specify and send detailed profile execution information to the Syslog Server. For a complete list of supported JSON Advanced Logging variables, refer to the SyncBack Help documentation under Technical Reference > Variables, in the Advanced Log Variables section. If you are new to variables, our What are Variables and Why are they used? article explains what they are and how SyncBack uses them.
For this example, JSON is selected as the logging format.
3. Configure the Limit file entries in the log option to specify the maximum combined number of file entries that SyncBackPro can send to the logging system for each profile run. This option helps prevent an excessive number of file entries from being sent to the server.
For this example, the Limit file entries in the log option is set to 5.
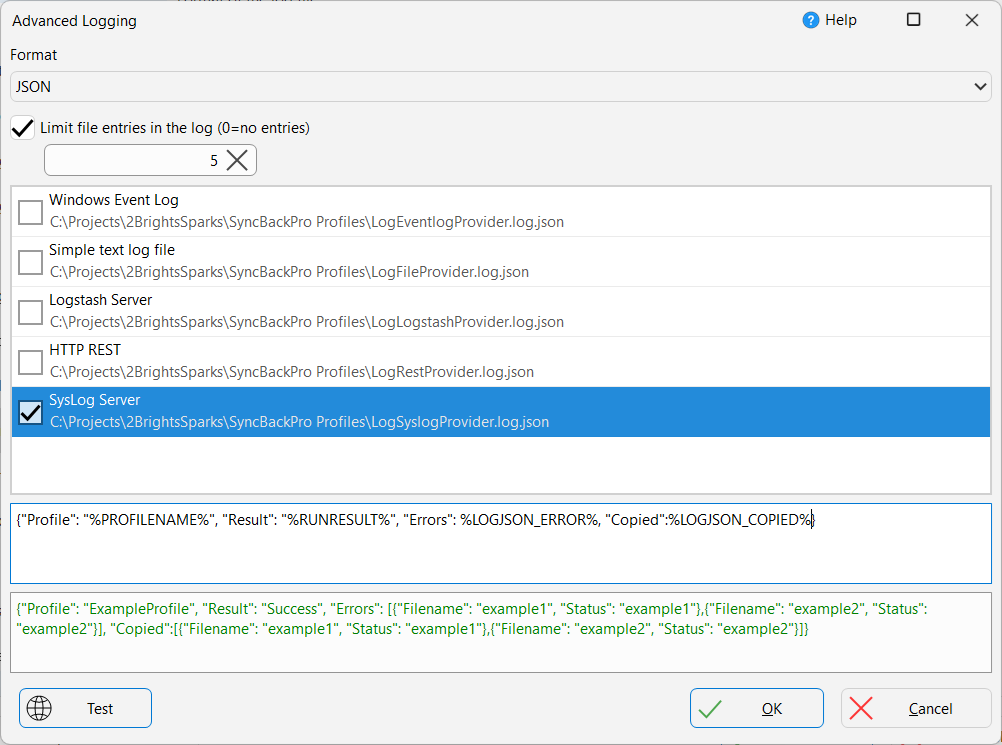
4. Next, select and configure the logging systems to which you want to send the log information. Multiple logging systems can be selected.
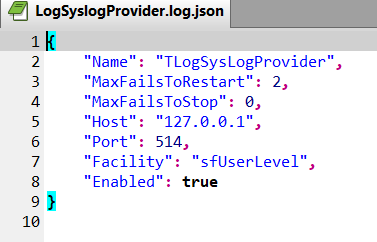
For this example, SysLog Server is selected. Enable the checkbox next to SysLog Server, then right-click it and select Edit to configure the SysLog server settings, such as the IP address and port. Save the LogSyslogProvider.log.json file once the configuration is complete.
If the SysLog server is installed on the same PC or server as SyncBackPro, you can use the default settings:
5. Specify the information to be sent to the logging system in the edit box. After entering the required information, right-click the edit box and choose Validate from the pop-up menu to check for errors. If no errors are detected, a success message is displayed.
In this example, the following variables are defined:
{"Profile": "%PROFILENAME%", "Result": "%RUNRESULT%", "Errors": %LOGJSON_ERROR%, "Copied": %LOGJSON_COPIED%}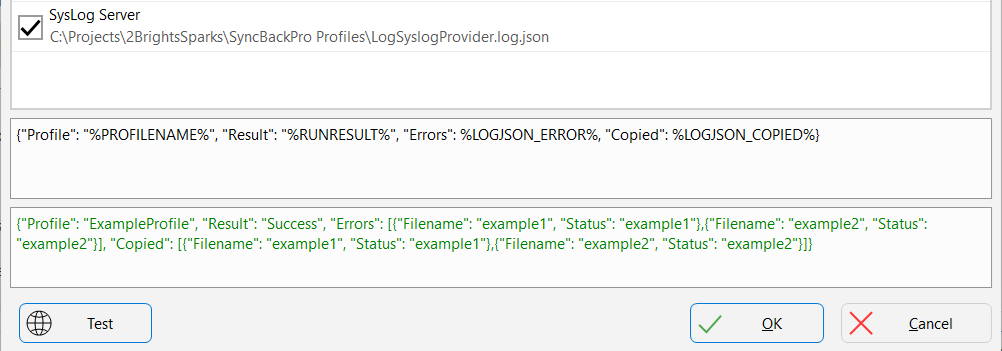
6. Click Test to verify the log information and format that will be sent to the logging server. This allows you to confirm that the configured information is correct before running a profile. Once the test is complete, click OK to close the settings page.
7. Run the profile. The configured log information will be sent to the SysLog server:

Important Points to Note
1. The Limit file entries in the log option specifies the total number of file entries that can be sent to the logging system across all defined variables. If multiple variables are used, such as %LOGJSON_COPIED%, %LOGJSON_WARNING%, and %LOGJSON_ERROR%, the combined number of file entries returned by these variables cannot exceed the configured limit.
For example, if the Limit file entries in the log option is set to 10, a maximum of 10 file entries can be sent to the logging system for each profile run, regardless of how many variables are defined.
File entries may be returned from any of the defined variables up to the specified limit. The number of entries returned by each variable is not fixed and may vary depending on the profile execution results.
2. After configuring a logging system, be sure to save the corresponding log.json file before closing the Advanced Logging page. Otherwise, the configuration changes will not be applied.
3. When enabling or disabling a logging system, you must restart SyncBackPro for the changes to take effect.
Conclusion
Advanced Logging in SyncBackPro allows you to send detailed profile execution information to external logging systems, providing greater visibility into backup operations and profile activity. It can send information such as the profile run result, errors, warnings, and details of files that were copied or deleted. This makes it easier to monitor backup activity, track file changes, and troubleshoot issues.
If you would also like to be alerted directly when a profile has run, for example by email, see our Notifications article for the different ways SyncBack can notify you.