At the top-left of the main windows is a burger menu ![]() , which when clicked, shows more options, one of which is Global Settings:
, which when clicked, shows more options, one of which is Global Settings:
Update Check: If this button is clicked a check is made to see if a new version of SyncBackPro is available for download. You can also check via the Help tab in the main window. Internet access is required to check for new versions. If a new version is found, you have the option to ignore it. If so, SyncBackPro will not prompt you again about a new version being available (when doing automated periodic update checks). Skipping versions is not recommended as they may contain critical bug fixes.
You can re-order the tabs (on the left) by simply dragging them into the order you wish. If you want to reset the order, right-click on any of the tabs on the left and select Reset from the pop-up menu.
There are a number of tabs available. Not all of them are visible, depending on the settings, environment and which implementation of SyncBack you are using:
•Easy
•FTP
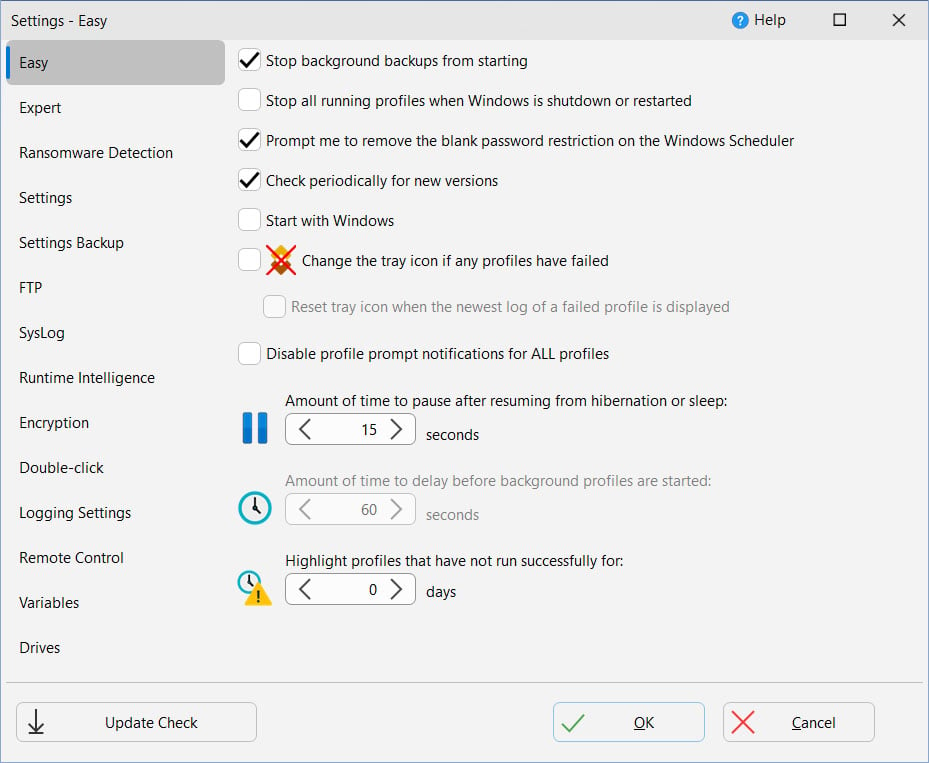
•Stop background backups from starting: If ticked, any profiles set to run in the background (periodically, via a file/folder change or when a program is started or stopped) will not be started. This does not affect scheduled tasks, profiles set to run on media insert, or profiles set to run on login or logout. If this setting cannot be changed then Windows has enabled battery saver mode (e.g. your using a laptop and the battery is low) or you are using a UPS (Uninterruptible Power Supply), e.g. mains power is off.
•Stop all running profiles when Windows is shutdown or restarted: If enabled then when you shutdown or restart Windows then all running profiles will be stopped.
•Prompt me to remove the blank password restriction on the Windows Scheduler: By default you cannot use a blank/empty password when scheduling tasks. If this item is ticked then whenever you schedule a profile, and you are using Windows with this restriction, you will be prompted to ask you if you'd like SyncBackPro to remove that restriction. Note that you will not be prompted if the restriction has already been removed. If you do not have the access rights in Windows to remove the blank password restriction then the checkbox is disabled.
•Check periodically for new versions: If ticked then SyncBackPro will check, every 30 days, if a new version of SyncBackPro is available. See also the Update Check button (to check for a new version immediately) and also the Help -> Update Check main menu item. Internet access is required to check for new versions. Variables are also available that can retrieve the latest version number and also check to see if a new version is available.
•Start with Windows: If ticked, SyncBackPro will start after Windows is rebooted and you login (Important: It actually starts after you login to Windows and not before login). By default, it will start minimized. If you have profiles set to run periodically (not via a schedule), or to run whenever there are changes, it is recommended you use this option. If this setting is ticked, but not enabled, then SyncBackPro is set to run elevated but you are currently running SyncBackPro unelevated, which means (due to Windows security) you cannot change the setting.
•Change the tray icon if any profiles have failed: If ticked, and any profiles fail when run, then the icon shown in the system tray (taskbar corner) will change to indicate this. To reset the icon, e.g. you have reviewed the failed profile(s) and are aware of the problem, then right-click on the SyncBack tray icon and select Reset tray icon. The tray icon will show an orange cross if background backups are being stopped from starting (see option above) and a red cross if background backups can start.
oReset tray icon when the newest log of a failed profile is displayed: If ticked then the tray icon is automatically reset when the newest log of a profile (that has failed) is displayed. Viewing older logs, or logs of profiles that haven't failed on their last run, will not reset the tray icon.
•Disable profile prompt notifications for ALL profiles: If enabled then profile prompts are never shown. This is a quick way to switch off the notifications if you find them distracting
•Amount of time to pause after resuming from hibernation or sleep: If the computer is put into sleep or hibernate mode, then resumed, this is the number of seconds that SyncBackPro will pause (sleep) before it does anything. This gives Windows time to re-establish network connections etc.
•Amount of time to delay before background profiles are started…: When SyncBackPro is started it will wait this amount of time before the first background profile is started. This gives you time to disable background tasks or to exit SyncBackPro before they start.
•Highlight profiles that have not run successfully for…: If the value is above zero then any profiles that have not run successfully for that number of days will have a special icon ![]() placed next to their name in the main window (if using a dark style the icon is
placed next to their name in the main window (if using a dark style the icon is ![]() ). This lets you clearly see which profiles are not running as expected. Note that disabled profiles are ignored and it does not apply to group profiles. Profiles can override this setting.
). This lets you clearly see which profiles are not running as expected. Note that disabled profiles are ignored and it does not apply to group profiles. Profiles can override this setting.
•Use the Windows Event Log: If ticked then errors are recorded in the Windows Event Log. These are not profile errors but errors related to using the program when the user cannot be prompted. They are typically used by technical support staff to help debug problems with the software.
•Do not register COM objects: If ticked then SyncBack will not attempt to (re-)register any COM/ActiveX objects (DLL's). A number of COM/ActiveX objects are used which are initially registered during installation. However, other applications on your system may also use the same objects but different versions of them. For this reason SyncBack will re-register many of these COM objects whenever they are required.
•Allow access to mapped network drives (reboot required): If enabled, SyncBackPro will make a change to the registry so that elevated processes (like SyncBackPro and SyncBackSE) can see mapped network drives. This option cannot be changed if SyncBack is not being run elevated (as it requires elevation to change the setting in the registry). If the setting is changed then a reboot is required.
•Memory usage (higher memory usage increases performance): SyncBackPro can greatly reduce memory usage by storing some information in a temporary database on disk. This option lets you decide if you want to use more memory (which can improve performance) or less memory. It's recommended that you leave the setting to it's default. However, if you want to use less memory (e.g. because the system has limited memory) then you may want to change this setting. Note however that by using less memory profiles will be slower. Paradoxically, increasing memory usage can also cause profiles that have a large number of files (in the hundreds of thousands) to be slower (due to how data is inserted in memory). Also, there are other cases where memory usage can be reduced. For example, using a high level of file compression can dramatically increase memory usage.
•COM Objects: A list of the required COM objects is shown along with their version number. If a COM object is not registered then the checkbox is not checked/ticked. Correctly registered COM objects are checked/ticked and also disabled. To register a COM object click on the item.
•Scheduler Monitor Service: SyncBack includes a Windows service that runs in the background. It works with SyncBack to detect profiles that are not being run by the Windows Task Scheduler. In this section you can see if the service is installed and running. You can also stop the service from prompting you if it detects problems. See the Scheduler Monitor Service help page for details.
SyncBackPro has the ability to check if a file has been changed. If your system is infected with ransomware then it will encrypt many of your files, e.g. documents, text files, pictures, music, videos, etc. It usually won't encrypt files required by the system, e.g. EXE and DLL files. In most cases you will know immediately if you are infected with ransomware because it will likely prompt you for payment to decrypt your files. However, your backups are usually automated so your backups will continue to run, which means your backup files are likely to be replaced with the encrypted files. To avoid this happening you can configure SyncBackPro to check if a specific file has changed, and if so, no profiles will run. To use this:
1.Click the Create button. SyncBackPro will then create a file, with random content, in your My Documents folder. The file will have a random filename, but have the extension of .RTF
2.SyncBackPro will then calculate the hash file of that file and record it.
3.Now, whenever a profile is run, SyncBackPro will check to see if that file has changed, and if so, will not run the profile.
You can choose an existing file, if you wish, but you need to be sure that the file will not change. If you do change the files contents, click the Re-hash button to recalculate the hash value of the file. If you use an existing file it is recommended you copy a document or spreadsheet file that you already have and use the copy. By having an actual valid document it is more likely that it will be encrypted by ransomware.
If you no longer want to detect if the file has changed, click the Clear button.
|
Note that 2BrightSparks cannot guarantee that SyncBackPro will be able to detect all types of ransomware infection using this technique. |

•Put new, imported, and copied profile settings files into...: This setting defines where to put the settings files for new profiles (existing profiles settings files are not moved). It is recommended that Automatic is used.
If SyncBackPro is being run from removable media or an external drive (connected via USB or Firewire) then you will not be able to choose where to store profiles (they will always be stored in the same folder as the program). If you do not have write access to the folder SyncBackPro is being run from then you cannot choose that option.
The roaming application directory is for people using corporate networks where files are typically stored on a server.
You can also choose a specific folder to store your profiles and settings in. Optionally, you can specify that only that folder is used. An important point to remember is that if you change the folder then all the profiles in that folder become unavailable. You can also specify a settings folder to use via the command line.
The folder used for Automatic is based on the following:
•If a specific folder is defined then that is used if there is write access to the folder. Note that you do not need to have the option "A specific folder" enabled, just have a path defined for it.
•If SyncBackPro is being run from removable media or an external drive (connected via USB or Firewire) then the folder SyncBackPro is run from is used.
•Failing all the above, the current users application data directory is used, e.g. C:\Users\[username]\AppData\Local\2BrightSparks\SyncBack\
•Show when this hot-key is pressed: You can configure SyncBackPro to become active (if it is already running, e.g. minimized) when a specific hot-key is pressed, e.g. Ctrl-Shift-S. To remove the hot-key use the backspace key. To help you remember the hot-key, if SyncBackPro is configured to use a hot-key, and you are minimized to the system tray, then the hint on the tray icon will display the hot-key being used. Note that you can also have hot-keys to run specific profiles.
•Backup all profiles when the program exits (Unattended): This is the same setting as below except it applies only when exiting from an unattended run, e.g. run via a schedule. See the Alternative Settings Backup Options section below for more details on making backups of your profiles.
•Backup all profiles when the program exits (Attended): By default a backup is made of all the profiles when SyncBack exits, either attended (e.g. run manually from the Start menu) or unattended (e.g. run automatically from a schedule). If this option is enabled, then a backup of all the profiles is made automatically when SyncBack exits from an attended run. Below the checkbox you can specify where to put the backup of the profiles. See the Alternative Settings Backup Options section below for more details on making backups of your profiles.
•Number of days backup to keep: By default SyncBack will delete backup profile files that are over 30 days old. You can change this or set it to keep the backups forever (by using 0 days). See the Alternative Settings Backup Options section below for more details on making backups of your profiles.
•Import profile from backup: If clicked, then the Global Settings are closed and a window is opened where you can import the backup of a profile. The button is only enabled if there are backups available.
The backup directory can contain variables. In fact, you should use variables to make sure multiple backups of profiles are made. The default is %SYNCBACKBACKUPFOLDER%%DAYOFWEEKNAME%
|
If you are using SyncBackPro or SyncBackSE then note that it is run elevated, meaning it will not have access to mapped drives. If you want to backup your settings to a network drive then you must use the UNC path and also make sure no username or password is required to access it. |
Alternative Settings Backup Options
You can choose to have your profiles automatically backed up to another folder when the program exits. This backup can be done when run attended, e.g. it was run manually from the desktop or start menu, and/or unattended, e.g. it was run automatically from a schedule. If you have a large number of profiles then you may wish to only backup your profiles when exiting from an unattended run.
When you close SyncBack, via the Exit button at the bottom-right of the main windows, there is a drop-down menu to tell SyncBack if it should backup the profiles or not, regardless of the settings.
Another profile backup option is to use the –export command line parameter. You could create a scheduled task in Windows to run SyncBack (with just the -export command line parameter) every morning, for example, to backup the profiles.
You can manually create a backup of your profiles by simply exporting them.
To restore your profiles you can simply import them or via the program main menu Export / Import -> Import profiles from backup.
|
So as not to interfere with the Windows shutdown/restart/logoff process, profiles will never be automatically backed up if SyncBack is closing due to a Windows shutdown/restart/logoff. |
This page contains settings related to how SyncBackPro communicates with FTP, FTPS, and SFTP servers. It is strongly recommended that you do not change any of these values and that the defaults are used.
•File buffer size: This is the size, in bytes, of the buffer used to send and receive files. The default size is 262144 bytes, and the minimum size is 8192 bytes.
•Send buffer size: This value directly affects the TCP window size. If the value is set to 0 the default Windows value is used and setsockopt() is not called. The default SyncBackPro value is 131072 bytes. This setting is only used by SmartFTP (FTP and SFTP) and Eldos FTP (not Eldos SFTP).
•Set the send buffer size automatically: When enabled the send buffer is automatically increased after the socket is connected until it reaches the optimal size. This option is enabled by default. This setting is only used by SmartFTP (FTP and SFTP) and Eldos FTP (not Eldos SFTP).
•Receive buffer size: This value directly affects the TCP window size. If the value is set to 0 the default Windows value is used and setsockopt() is not called. The default SyncBackPro value is 131072 bytes This setting is only used by SmartFTP (FTP and SFTP) and Eldos FTP (not Eldos SFTP).
•Set the receive buffer size automatically: When enabled the receive buffer is automatically increased after the socket is connected until it reaches the optimal size. This option is enabled by default. This setting is only used by SmartFTP (FTP and SFTP) and Eldos FTP (not Eldos SFTP).
This page contains settings related to how SyncBackPro communicates with a SysLog server (as specified in RFC 3164 and RFC 5424). When certain tasks are performed, e.g. profiles run, a message will be sent to the SysLog server.
2BrightSparks introduced a freeware SysLog server and client along with SyncBack V11.
•Send status messages to a SysLog server: If enabled, messages will be sent to a SysLog server.
•SysLog hostname or IP address: The hostname or I.P. address of the SysLog server. To broadcast use the I.P. address 255.255.255.255
•SysLog port number: The port number of the SysLog server. The default is 514.
•SysLog facility number (0 to 23): The facility number that SyncBackPro should use in messages sent to the SysLog server. The default is 16. Note that usually the numbers 0 to 15 are used for system messages.
•Send date and time in GMT timezone: The dates & times of the messages can either be in the local timezone (of the computer running SyncBackPro) or in the GMT/UTC timezone. This setting is not relevant and ignored when RFC 5424 is used.
•Send messages in UTF8: Messages can either be in ASCII or UTF8.
•Prefix messages with username: To help with tracking, the messages sent to the SysLog server can optionally be prefixed with the Windows username.
•Use RFC 5424 standard (otherwise it is RFC 3164): If enabled then the messages are sent using the RFC 5424 standard instead of the default RFC 3164 standard.
•Send Test Message: Press to send a test message to the SysLog server.
The format of the profile end message is:
Profile [Profile_Name] Message [[Result=Result_Value Result_Description][Error=Error_Message][Integrity Check | Simulated][Restore][Unattended][Group=Group_Name][ProfileName]]
The severity is Informational, except when the profile run fails and it is Error.
Many of these are optional, e.g. if there is no error message then it will not be there. For the profile result, the numeric values are:
0 = Unknown profile
1 = Profile is already running
2 = Profile has been imported and not run yet
3 = Profile is running
4 = Internal error
5 = Simulated run was aborted
6 = Simulated run failed
7 = Simulated run was a success
8 = Restore was aborted
9 = Restore failed
10 = Restore was a success
11 = Run was aborted
12 = Run was aborted (remotely)
13 = Run failed
14 = Run was a success
15 = Failed due to network connection
16 = Failed because left or right could not be scanned
17 = Failed because the left and right could not be compared
18 = Run failed because Run Before program stopped profile
19 = Run failed because profile is disabled
20 = Run failed because drive errors were found
21 = Run failed because the log could not be emailed
22 = Run failed because the Volume Shadow Copy service failed
23 = Profile was aborted because it reached its run-time limit
24 = Profile was aborted because too many files would be deleted
25 = Profile was aborted because too many files would be updated
26 = Profile was aborted because too many files would be copied/moved
27 = Integrity check run was aborted
28 = Integrity check run failed
29 = Integrity check run was a success
30 = Ransomware Protection
31 = Incorrect elevation
SyncBack stores passwords and other sensitive settings in an encrypted form. By default, a very simple encryption is used and it is relatively easy for someone to decrypt it (if they have access to your settings files). However, there are settings to make it considerably more difficult to decrypt:
|
SyncBack uses the Windows encryption routines, which means that the following encryption options are only available if your installation of Windows allows for 256-bit AES encryption. It may not be available due to the import and/or export laws in your country.
An important point to remember is that if you use any of these encryption settings then it limits what you can export and import.
For example, if you use a key file then another computer will not be to use any profiles you export unless they also have your key file. If you use the Windows Data Protection option then another computer (or even Windows user on your computer) will never be able to use any profiles you export.
Also, if any of these settings are changed then SyncBack must re-encrypt all your encrypted settings (program settings and for all profiles). |
•Use 256-bit AES encryption for storing sensitive settings: If set, SyncBack will use 256-bit AES encryption. Although this is a much stronger method of encryption than the default one, it is not impossible for someone determined enough to decrypt these settings (if they have access to your settings files). This is because the key to the encryption is within SyncBack itself and is the same key for all installations of SyncBack. By using the same key it simplifies exporting and importing profiles. You also have no encryption or decryption key to lose (and so lose access to the encrypted settings). With the next setting you have the option of supplying your own encryption key.
•Encryption key for sensitive stored settings: If set, SyncBack will use the encryption key stored in the specified file. You can create an encryption key file by clicking the Create Key File button (see below). Without this file it is impossible for someone to decrypt your settings. It also means that if you lose the file, its contents change, or you don't have access to the file (e.g. it's on a USB key and you forgot to plug it in), then SyncBack will not be able to decrypt your settings. It is recommended that you create the file on removable storage (e.g. a USB key) so that you can keep the file physically secure and also make a secure backup of the file. If you export a profile then you must remember that the computer that imports the profile will not be able to decrypt the settings without access to the key file.
oCreate Key File: When pressed you are prompted for a password. Enter a password (we recommend it contains at least 16 characters) then choose the file name to store the encryption key in. The filename can be whatever you want, and have any filename extension, but it must have a filename extension, e.g. enc.key. The file should be stored somewhere secure that SyncBack can access whenever it is run. Note that the key file you create is not used unless you select it as the key file.
•Secrets Manager: To access your Secrets Manager settings, click this button.
•Store sensitive settings using the Windows Data Protection API: If set, SyncBack will use cryptographic routines in Windows to further encrypt the settings. This makes it impossible for someone to decrypt your settings, even if they have your settings files and the encryption key file, unless they are also logged into your Windows account on your computer. If you use this option you are strongly advised to create a Password Reset Disk whenever you change your Windows password. The reset disk must obviously be kept physically secure. If you export a profile then you must remember that the computer that imports the profile will not be able to decrypt the settings unless it is the same computer and same user account. If you reinstall Windows you will probably also lose access to the encrypted settings. If an administrator forcibly changes your Windows password you will also lose access to the encrypted settings (it's not a problem if you yourself change your Windows password).
If you lose the key file, or you are using the Windows Data Protection API and import your exported profiles on another computer (for example), then your encrypted settings will essentially become corrupt and invalid. Your serial number is one such setting, which means you will be prompted for your serial number again. All passwords are also stored encrypted, so you will need to re-enter those.
When using SyncBackPro you can use a secrets manager to retrieve sensitive information instead of storing it locally.
Encryption Used |
Drawbacks |
Default |
No password to remember, but more secure. |
256-AES Encryption Only |
No password to remember, more secure than the default security but can be very secure when used with a key file and/or the Windows Data Protection API. |
Encryption Key File |
Very secure if the key file itself is secure (e.g. via NTFS security). However, if the key file is lost or corrupted then all encrypted settings will be lost (including access to any password protected profiles). |
Windows Data Protection API |
Very secure, but profiles cannot be used on any other computer or by any other Windows user. A Password Reset Disk should be created. |
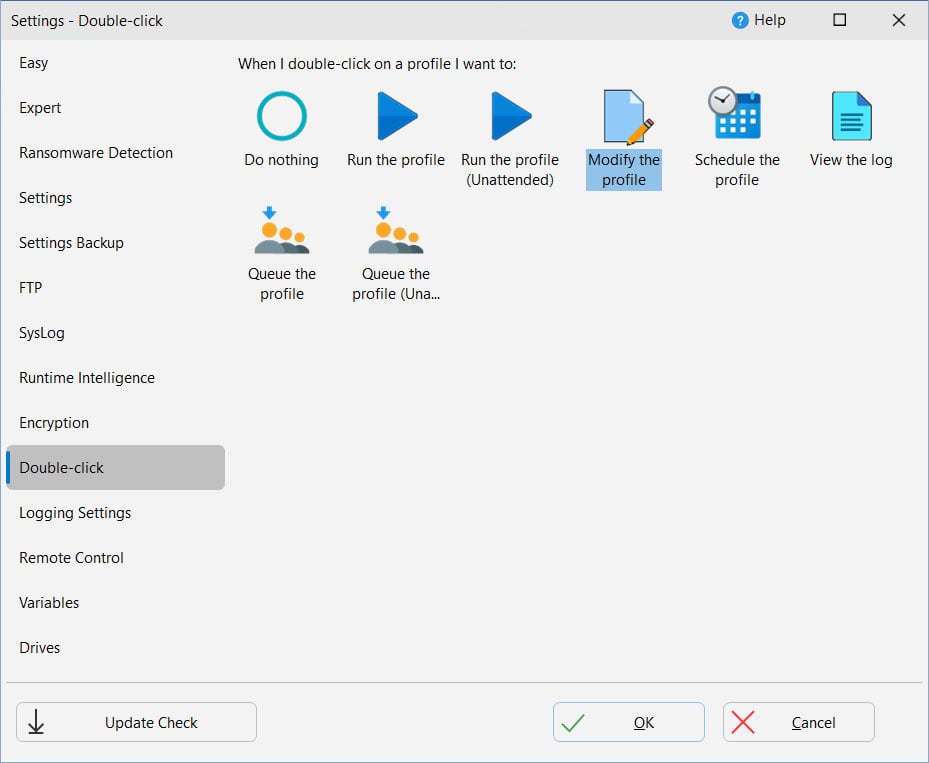
You can select what action SyncBackPro should take when you double-click on a profile in the main window:
This opens a window where you can change how profile log files are created. See this page of the help file for more details.
SyncBack Monitor allows the user to remotely monitor and control SyncBackPro/SyncBackSE instances running on computers on the same local network via an Android App.
Please note that SyncBack Monitor will work only with SyncBackPro/SyncBackSE V9 (and newer) and does not support SyncBackFree.
See the SyncBack Monitor page in this help file for more details.
You can define global variables here that can be used by all of your profiles. You can also define profiles at the group and profile level.
When you go to this tab, all of your drives are listed along with their S.M.A.R.T. status. It also shows the model of the drive, the media type (e.g. Fixed) and the connection interface (e.g. SCSI). This information is reported by Windows.
|
Note that you may be using NVMe drives that show as using a SCSI interface. Also, Windows does not report if a connection is SATA. This is normal and not something to be concerned about. SyncBackPro does not know or care what the connection interface is and is shown only for reference. |
This tab is only visible if SyncBack is being run elevated or Windows Administrator Protection is enabled.
•Create Not Elevated EXE: If the non-elevated version of SyncBack does not exist then you can click this button to create it. Note that the non-elevated version of SyncBack is created using a hard-link, meaning it does not use disk space. However, if a hard-link cannot be created, e.g. the file system does not support it, then it has to make a copy of the executable which does take a very small amount of extra disk space.
•Create Administrator EXE: If the Administrator version of SyncBack does not exist then you can click this button to create it. The Administrator version is used when deleting, creating or modifying elevated schedules from a non-elevated instance of SyncBack. Note that the Administrator version of SyncBack is created using a hard-link, meaning it does not use disk space. However, if a hard-link cannot be created, e.g. the file system does not support it, then it has to make a copy of the executable which does take a very small amount of extra disk space.
•Create Shortcut With No UAC Prompt: When you run SyncBack elevated, Windows will show the User Account Control (UAC) prompt. Over time, this may become annoying, especially if you start SyncBack manually frequently. You can disable the UAC prompt in Windows, but this is not advisable. An alternative is to set SyncBack to start with Windows when you login. In this case it will already be running and no UAC prompt will appear. If that is not an option then you can click this button. You are asked where to create a Windows shortcut, e.g. on your desktop. This shortcut, when run, will trigger a specially created scheduled task (which is created automatically when the button is pressed). If you start SyncBack manually using this shortcut then you will not get a UAC prompt. Note that you cannot pass any command line parameters to SyncBack via this shortcut as the shortcut is actually for the task scheduler which then starts SyncBack. You can manually edit the scheduled task to add parameters if you wish. Also, shortcuts can be assigned hotkeys. Important: If Administrator Protection is enabled in Windows then you cannot use this shortcut trick to bypass UAC prompts.
•Do not warn if the shadow/virtual account is being used (if Administrator protection is enabled in Windows): If you are using Windows 11 (build 27718 or newer) then within the Windows Account Protection settings there is the option to enable Administrator protection. If you start SyncBack elevated, and Administrator protection is enabled, then SyncBack will display a warning to remind you that you are not using your actual Windows account but are instead using the shadow/virtual administrator account. This may have a major impact on your profiles. Refer to the Administrator protection help page for details.
•Enable the Process Redirection Trust Policy: There is an inherent security issue in Windows when any elevated process deletes junctions or symbolic links that point to certain folders. Windows has a fix for this, which a process must enable. SyncBackPro enables this option by default, and for security reasons, this setting is stored in the registry and not the usual settings files. This may have an impact on your profiles if you are running SyncBackPro elevated and are using junctions or symbolic links. If your logs contain the error "The path cannot be traversed because it contains an untrusted mount point", then Windows security (enabled by this setting) has stopped the file copy or delete. The cause is untrusted junctions or symbolic links. Basically, if a symbolic link is created by an unelevated (or untrusted) process, then it will not be followed. The Process Redirection Trust Policy in Windows is a security mitigation designed to prevent unauthorized redirection of file system operations, particularly those involving junctions or symbolic links created by non-administrative users. If you change this setting then you must restart SyncBackPro for it to take affect.
See the Elevate settings page for more details about elevation.
All Content: 2BrightSparks Pte Ltd © 2003-2026