
A Guide to Using DeleteOnClick
DeleteOnClick is very simple to use.
Securely Delete
Using Windows File Explorer, browse to the file or folder you wish to delete, click the file or folder using your right mouse button, select 'Securely Delete' from the pop-up menu. Click the confirm button to irrecoverably delete the file.
IMPORTANT
|
Files deleted using DeleteOnClick are permanently erased and can never be recovered, including the use of specialist data recovery programs. |
Detailed Explanation
Windows File Explorer lets you browse and select any file or folder on your local computer, as well as showing the files and folders on connected devices like CD, DVD, USB External Drives, Memory Sticks etc.
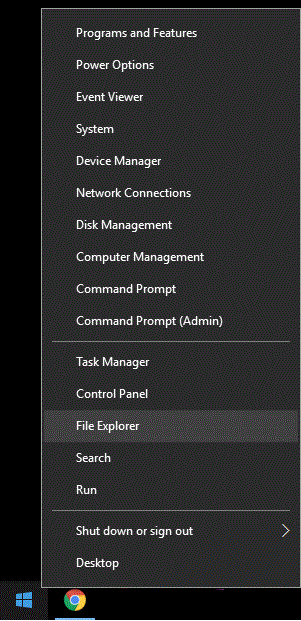
Open Windows File Explorer by right clicking 'Start'. A pop-up menu will appear. Select 'Explore':
![]() Alternatively you may wish to quickly open Windows File Explorer by pressing the 'Windows' and 'E' keys:
Alternatively you may wish to quickly open Windows File Explorer by pressing the 'Windows' and 'E' keys:

Windows File Explorer will now open showing your folders, files, and connected drives etc.
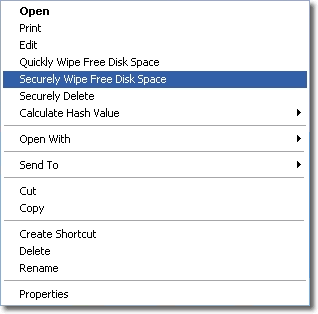
The example below shows how Windows File Explorer has been used to browse to the 'Local Disk (F:)' (which is actually an external USB Hard Drive). On the right panel a document called 'My PDF 1' has been right clicked with the mouse button, and the menu item 'Securely Delete' has been selected from the pop-up menu:
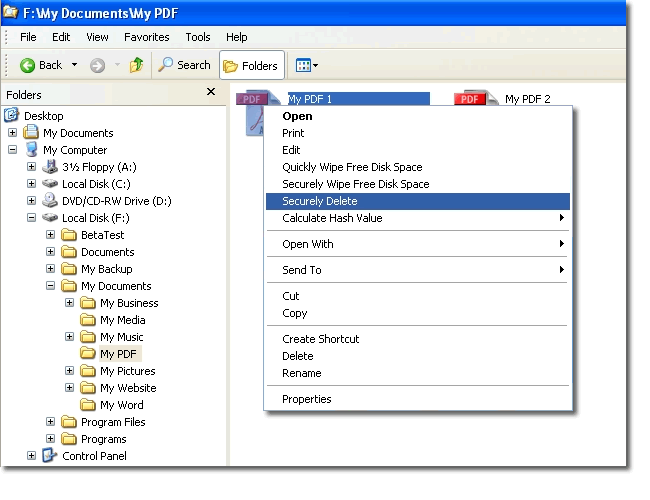
![]() Note that your pop-up menu may look slightly different than the one above depending on your system configuration, and the programs which are integrated with Windows.
Note that your pop-up menu may look slightly different than the one above depending on your system configuration, and the programs which are integrated with Windows.
Next, you will be prompted with a 'Confirm' Window that asks if you're sure you want to delete the selected item(s):
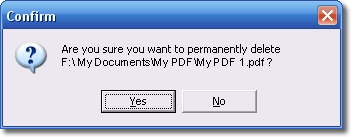
Click the 'Yes' button to delete the file.
IMPORTANT
|
Files deleted using DeleteOnClick are permanently erased and can never be recovered, including the use of specialist data recovery programs. |
Quickly Wipe Free Disk Space
When Windows "deletes" a file, it is not physically removed. The file is still on disk, however, Windows makes the space occupied by the file available for writing. This free space can take up considerable room on your drive, and wiping free disk space helps your computer to run better and faster.
The Quickly Wipe Free Disk Space option is around three times as fast as using the Securely Wipe Free Disk Space.
|
Note however that wiping free disk space takes a considerable amount of time depending on the size of your drive, the performance of your computer, and the amount of free disk space that can be wiped. |
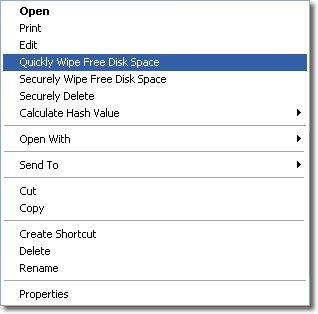
Right click on a drive and select Quickly Wipe Free Disk Space from the menu:
The Delete progress window will open showing the progress of how much of the free disk space has been wiped:
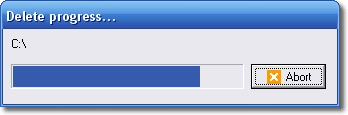
You may click the Abort button at any time to stop the process.
Securely Wipe Free Disk Space
The Securely Wipe Free Disk Space option (available when you right click a drive) ensures all deleted files are wiped: the data that takes up that free disk space will be completely unrecoverable, traceable, or recognizable.
|
Wiping free disk space using Securely Wipe Free Disk Space takes a significant amount of time depending on the size of your drive (around three times more than quickly wiping free disk space with DeleteOnClick), the performance of your computer, and the amount of free disk space that can be wiped. |
Right click on a drive and select Securely Wipe Free Disk Space from the menu:
The Delete progress window will open showing the progress of how much of the free disk space has been wiped:
You may click the Abort button at any time to stop the process.
|
Files deleted using DeleteOnClick are permanently erased and can never be recovered, including the use of specialist data recovery programs. |
Frequently Asked Questions
FAQs about using DeleteOnClick follow on the next page of this help file.
All Content: 2BrightSparks Pte Ltd © 2003-2024