When you run a profile, if there are any differences detected, e.g. files have changed, this differences window will appear. You can configure your profile never to show this window (see the Compare Options page when creating/modifying the profile).
|
The Differences window is not shown for unattended runs, e.g. scheduled tasks, if you run SyncBackPro with command line parameters, if the Skip the Differences screen option is enabled for the profile, or if there are no differences. There is also an option to automatically close the Differences window if it is empty (due to the filter settings).
The Differences window will always be shown when doing a restore or simulated run.
If your profile contains tens of thousands of files (or more) then it is not recommended that the Differences window be displayed. This is because displaying so many files uses a lot of CPU time and RAM, and takes a long time to sort. If the file information has been dumped to a database (either due to the large number of files, or lack of free RAM), then please note that the sorting will be different. Folders will be listed separately from files, e.g. folders are shown first, then files. This is done to improve performance (the sorting is done by the database instead of the display). |

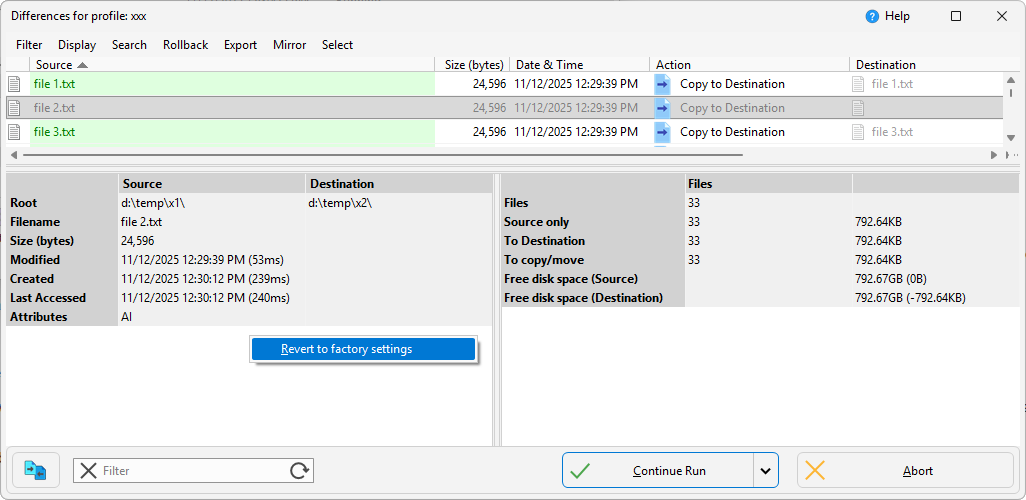
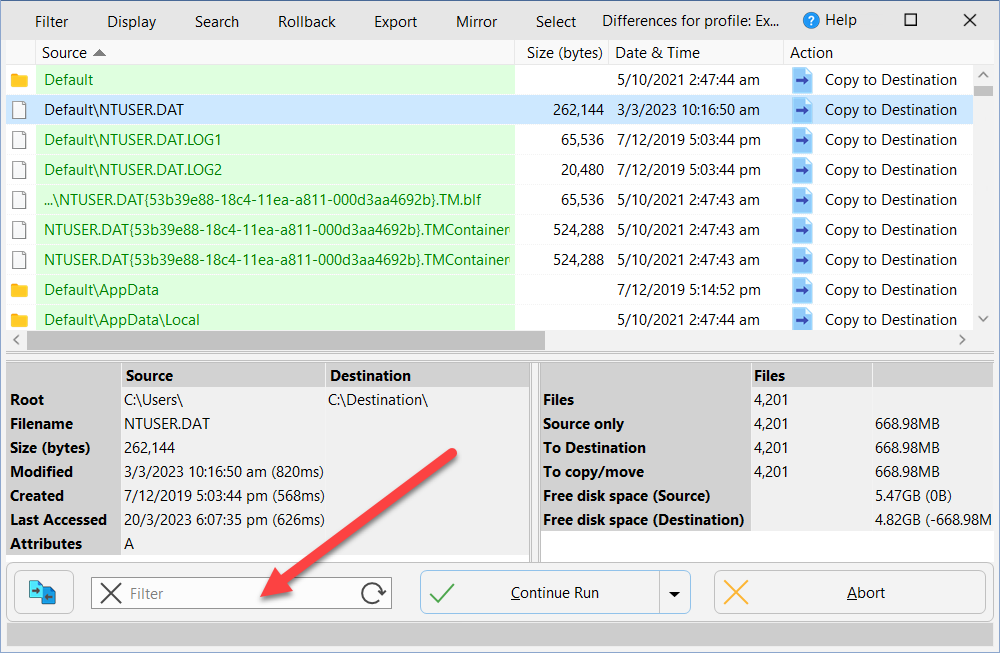
When a profile is run, SyncBackPro will compare the source/left and destination/right files to find the differences. There may be files in the source/left that are not in the destination/right, for example. After it has made the comparison it will display the Differences window that lists all the differences between the source/left and destination/right. This gives you a chance to see what will happen and change what actions will be taken. For example, a file may be marked for deletion but you may decide not to delete that particular file.
At the bottom left of the window are details on the currently selected files. It shows the differences between the file on the left and the file on the right. Newer dates & times, and larger file sizes, are shown in green, older dates & times, and smaller file sizes, are red. If the profile is an Intelligent Synchronization profile then a checkbox labeled Show previous details of the files is shown in the bottom left. To show the previous details of a file you must first select the appropriate file and then tick the checkbox. It will now show the details of the file the last time the profile was run. Obviously new files will not have previous details. See below for a description of the attributes.
The bottom right panel gives details on the number of files, and the amount of data, that will be copied, deleted, and skipped.
|
Note that the free disk space shows the estimated free disk space on the source/left and destination/right based on the actions made. For example, if you choose to delete files from the right then its free disk space will increase. |
Between the Left and Right columns is the Action column. This shows what will happen to that file. Note that not all the options are available for each file as it depends on what the situation is with that file. For example, you cannot copy a file from the left/source if it only exists on the right/destination:
|
Skip: Ignore the file and do nothing. |
|
Skip and Exclude: Ignore the file and do nothing. The file will be ignored in all future profile runs as well. See the help in the File Collision window for more details. |
|
Copy to right: Copy the left file to the right. This will overwrite the right file, if it exists. |
|
Copy to left: Copy the right file to the left. This will overwrite the left file, if it exists. |
|
Move to right: Move the left file to the right. This will overwrite the right file, if it exists, and delete the file from the left. |
|
Move to left: Move the right file to the left. This will overwrite the left file, if it exists, and delete the file from the right. |
|
Unchanged: This option is only available when running a Fast Backup profile. By selecting this option you are telling SyncBackPro that the file actually has not changed and nothing should be done. This is useful, for example, when you have a copy of a file on an FTP server but the date & times do not match. However, you know the file is identical. |
|
Delete: Delete both the source and destination files. |
|
Delete from left: Delete the file on the left. |
|
Delete from right: Delete the file on the right. |
|
Collision, prompt me: You will be prompted what choice to make after you close this window. |
|
Missing, prompt me: You will be prompted what choice to make after you close this window. |
|
Details differ, prompt me: If the files are identical, but their attributes are different, then you can choose to be prompted on which files attributes to use. |
|
Use details from left: The files are identical, but their attributes are different, so copy the attributes from the left file to the right file. |
|
Use details from right: The files are identical, but their attributes are different, so copy the attributes from the right file to the left file. |


There are four ways to change the Action for a file:
•Click on the Action item and select the new action from the pop-up menu
•Right-click on the row and select the new action from the pop-up menu
•Press Ctrl-P for the file collision window to appear
•Use hot-keys (see below)
You can change the action for multiple files by clicking on the rows and pressing the Shift and Ctrl keys. You can press Ctrl-A to select all the files. Right-click on the selection and choose the action from the pop-up menu. Only actions that are available for all the selected files are shown.
When changing the action for a folder, it is recursive. For example, if you change the Action for a folder to Skip, then it, all files in the folder, all sub-directories, and everything in those, will also be set to Skip.
You can use the following hot-keys to change the action of the selected items:
•Ctrl-S: Skip the files
•Ctrl-E: Skip and exclude the files
•Ctrl-L: Copy files to the source/left
•Ctrl-R: Copy files to the destination/right
•Ctrl-D: Delete the files from both the source/left and destination/right
•Ctrl-U: Mark the files as unchanged (Fast Backup profiles only)
•Ctrl-N: The newer file will replace the older file (any version changes are lost)
•Ctrl-P: The file collision window will be displayed for each selected item
To be prompted immediately on what to do with a file you can select the file (by clicking on its row) and pressing Ctrl-P (or by double-clicking the row, or selecting 'Prompt me now' from the pop-up menu). The File Collision Window will appear from which you can make a choice. Note that nothing is done with the file until after the Differences window is closed.
After you have reviewed the differences, made whatever changes are required (if any), and are ready to continue with the profile run, you can click either the 'Continue' button or the 'Abort' button. Aborting will stop the profile run immediately and no files will be copied, deleted, or moved.
Main Menu
There is a main menu at the top of the Window. You can optionally use the Alt key to show/hide it and also use shortcut keys (Alt-F, Alt-D, Alt-S, Alt-R, Alt-E, Alt-M, Alt-L).
•Filter
oShow files/folders not on left: If not selected then files and folders that are only on the right are hidden.
oShow files/folders not on right: If not selected then files and folders that are only on the left are hidden.
oShow skipped files/folders: If not selected, then skipped files and folders are not shown.
oShow changed files: If not selected then files that are on both the left and right, and are different, are hidden.
oShow files skipped due to rename: With Intelligent Synchronization profiles files that have been renamed can be detected. When a renamed file is detected there are two entries: the old name and the new name. By enabling this option you can see both entries.
oRevert to factory settings: Select this option to revert the Filter menu selections to their factory settings. You can also right-click on in the tables at the bottom-left and bottom-right of the window to reset those column widths:
oAll: If selected then all files and folders are shown and the filters are reset.
oSource only, Destination only, etc: If selected then the files shown are filtered as appropriate. No folders will be shown. You can also click on the rows in the totals grid at the bottom-right of the window to apply a filter. For example, if there is a row showing how many files are going to be skipped then you can click on that row to apply a filter to show only skipped files. Clicking on the "Unchanged" and "Free disk space" columns will do nothing.
Note that there is also a way to filter what is shown based on the file name. See the Filtering section below for details.
•Display
oOnly show action icons, not text: If selected then the Action column will just show icons and not text. This reduces the width of the Action column giving you more space.
oOnly show files to be deleted or replaced: If selected then only files that are going to be deleted or replace will be shown. No folders will be displayed. Note that if a file is being moved, and is not replacing a file, then that is not regarded as a file that is to be deleted. To avoid performance problems the display is not automatically updated if you change the action of a file, so to refresh the display you must disable and re-enable this option. Also, this setting is not saved.
oKeep window on top of all others: If selected then the Differences window will be placed above all other windows on your desktop.
oShow size column: If selected then the Size (bytes) column is shown.
oShow date & time column: If selected then the last modification Date & Time column is shown.
oShow filename extension column: If selected then the filename Extension column is shown.
oDo not display this window again for this profile: If ticked then this window will not be displayed again when this profile is next run. This is identical to the "Skip the Differences screen when this profile is run (it is never shown when unattended)" option in the Compare Options page in the profiles configuration. Note that this checkbox is not shown when the run is a simulation or a restore (as the Differences window is always shown when a profile is run in simulation or restore mode).
oAuto Preview: If enabled, and you click on a file in the window, then a preview of the file contents will appear. File previews are not available for remote destinations, e.g. cloud, FTP, etc. Not all file types can be previewed. You can also manually preview a file contents by selecting it and pressing Ctrl-V.
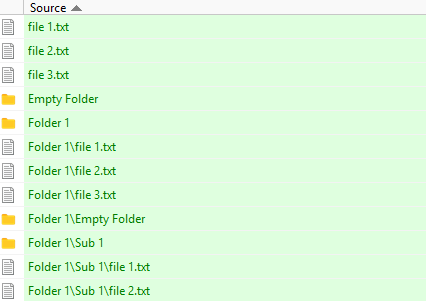
oList Format: By default, files and folders are listed in the window without any indentation.
▪Default: No indentation:
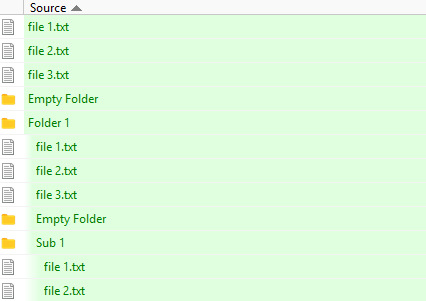
▪Indent: Indentation is based on tree-depth:
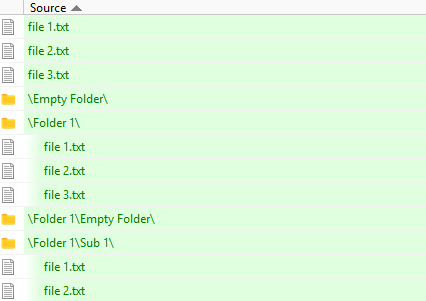
▪Indent Files: Only files within folders are indented:
•Search
oFind: Select this menu item to find files or folders based on their name. For example, to find all files and folders with the text temp in their name simply enter temp. You can also use wild-cards. For example, to find all files with the .txt extension search for *.txt. An asterisks (*) matches zero or more characters. A question mark (?) matches any single character. SyncBack automatically wraps a search term with asterisks unless it is wrapped in double-quotes or has an asterisks or question mark in it. For example, if you search for abc then SyncBack will change that to *abc*. If you really want to search for just abc and not everything with abc in the name then use "abc"
oFind Next (F3): Searches for the next item that matches the previously entered search term.
•Rollback
SyncBack can roll-back files to their state at a previous date & time. When one of the following menu items is selected a window will appear for you to select a date & time to rollback to. See the Rollback section below for details.
oRollback all source/left files: If selected all the source/left files will have their action changed so that they will be rolled back to the selected date & time when the profile continues.
oRollback all destination/right files: If selected all the destination/right files will have their action changed so that they will be rolled back to the selected date & time when the profile continues.
oRollback selected source/left files: If selected all the selected source/left files will have their action changed so that they will be rolled back to the selected date & time when the profile continues.
oRollback selected destination/right files: If selected all the selected destination/right files will have their action changed so that they will be rolled back to the selected date & time when the profile continues.
•Export
SyncBack can export the rows to a CSV (Comma-Separated Values) file, which can then be imported into other software, e.g. Microsoft Excel. You can also export to the clipboard. Only the data from visible columns will be exported (including script generated columns).
oExport all...: This will export all rows to a file.
oExport selected...: This will only export the selected rows to a file.
oExport all to clipboard...: This will export all rows to the clipboard.
oExport selected to clipboard...: This will only export the selected rows to the clipboard.
•Mirror
oMirror all the files/folders to Destination/Right...: When this button is clicked all the files on the left will have their action changed so that they are copied to the right (hold down the SHIFT key while pressing the button to move the files). Any files on the right which are not on the left will have their action changed so they are deleted. This button lets you quickly tell SyncBackPro that the right should have exactly the same files as the left. Note that you can mirror a selection of files via the pop-up menu.
oMirror all the files/folders to Source/Left...: This does the opposite of the above button, i.e. the left should have the same files as the right. Note that you can mirror a selection of files via the pop-up menu. You cannot mirror files to the left if you have a traditional fast backup profile.
•Select
You can have files in the list automatically selected based on their action. For example, to select all files that are being copied to the destination or deleted from the destination, click the drop-down and select Copy to Destination and Delete from Destination.
As well as filtering what is shown based on where it is and the action to take (on the Filter tab, see above), you can also filter what is displayed based on its name.
You can type in a file name to just show files (and folders) with that name. You can use also use the special characters asterisk (*) and question mark (?). An asterisk represent zero or more of any character, and a question mark represents one of any character. Searching is not case-sensitive, i.e. ABC will match abc, AbC, etc.
For example, to only show files with the extentsion .DAT files you would enter *.DAT in the filter and press enter or the refresh button on the right of the filter edit box.
You can also use the pop-up menu to enter a filter. If you right-click on a folder, and select Only show this folder, then the filter is set to just show what is in that folder. If you right-click on a file, you can select Only show files with this extension or Only show files with this filename. The filter can also be cleared from the pop-up menu (Clear filter).
If you prefer, you can change the double-click action to use filtering. For example, if you right-click on a file or folder, and go to the Double-click action sub-menu in the pop-up menu, you could change it to Only show this folder. That way, when you double-click on a folder in the display, it will just show what is in that folder. This gives you a quick and simple way to drill-down into the contents of folders.
To quickly clear the filter you can press the X button in the filter edit box, or press the back button on the mouse.
Versions of files are restored via the Differences window. One way to ensure the Differences window is displayed is to run the profile by using Ctrl-R. If it's a backup profile you could also run it as a Restore.
When there are versions of a file available then a graphic ![]() is displayed next to the filename. If a file doesn't exist, but it does have versions, then the filename will be post-fixed (suffixed) with the text [Versions].
is displayed next to the filename. If a file doesn't exist, but it does have versions, then the filename will be post-fixed (suffixed) with the text [Versions].
To restore a version of a file simply click on the ![]() graphic and choose the version to restore from the drop-down list. The list gives the date & time when the version was made (it is not the last modification date & time, or creation date & time, of the file). Once a version to restore is chosen the filename shown will be post-fixed with the date & time of the version to be restored.
graphic and choose the version to restore from the drop-down list. The list gives the date & time when the version was made (it is not the last modification date & time, or creation date & time, of the file). Once a version to restore is chosen the filename shown will be post-fixed with the date & time of the version to be restored.
Versions cannot be restored if the Action is such that restoring the version would be pointless. For example, if you want to copy a source file to the destination (to replace the existing destination file), then you cannot restore a version of the destination file. It would make no sense because SyncBackPro would need to restore the destination version, then copy the source file to the destination, which would then replace the version you wanted to restore. In this case the text [unavailable] will appear in the pop-up menu. If you just want to restore the version change the Action to Skip and then choose the version to restore.
Keep in mind that restoring a version means any existing file will be versioned before it is replaced. For example, you have a source file that has one version. If you restore the version then a version of the existing source file will be made before the version is restored (basically the files are switched). This makes sense because you may later realize you made a mistake then it's very simple to correct it (you just restore the latest version, which was your original file).
It's possible to restore versions for multiple files. First, select the files you want to restore versions for (e.g. press Ctrl-A to choose all the files, or hold down the Ctrl key and click on a file to add it to the selection, or use Shift key and click to select a block of files). Next, right-click on the filename of one of the files you have selected. A pop-up menu will appear. Choose Restore Version, then Source or Destination (depending on where you want the versions restored), then you can choose either of the following options:
•Restore latest version (except if backup file available) - If the file has one or more versions, and doesn't exist in the source/destination, then it will restore the newest version of the file. If the file does exist then it won't do anything with that file.
•Restore latest version (even if backup file available) - If the file has one or more versions then it will restore the newest version of the file.
The rollback feature lets you rollback files to their known state at a certain point in time, with the last modification date & time of a file being used to determine this. You can rollback the source or destination. This feature works best when versioning is used otherwise it has nothing to restore from except the files that are on the other side (source or destination).
Empty folders are ignored and folders will not be deleted, but folders will be created as needed. Keep in mind that even if you are rolling back the source, for example, it can affect the destination. For example, a versioned file on the destination may be the best file to copy back to the source. In that case the destination will be changed as well because SyncBack will need to restore a version on the destination.
For example, you may want to rollback the source to 1pm on the 1st of June 2014. SyncBack will then look at the source, destination, and all the versions to see which file was last modified closest to that date & time (but not after it). It will then change the actions as appropriate. Let's say you are rolling back the source:
•SyncBack will first look at the current file on the source and get its last modification date & time.
•SyncBack will then look at the current file on the destination. If it was modified after the source file, but before the date & time you want to rollback to, then it will copy that file to the source.
•SyncBack will then look at the versions of the source file. If any of the versions are a better option (i.e. they were modified nearer to the rollback date & time but not after it), then it will instead restore one of those versions.
•SyncBack will then look at the versions of the destination file. If any of the versions are a better option (i.e. they were modified nearer to the rollback date & time but not after it), then it will instead restore one of those versions and copy it to the source.
When looking at a file, and it sees nothing that was modified before the rollback date & time, then it will do nothing with that file, i.e. it will set the file to be skipped. You can decide to delete the existing file, instead of skipping it and leaving it where it is, when selected the date to rollback to.
Comparing Files
SyncBack can tell you files are different, and using third party programs, you can ask SyncBack to show you the actual differences between the files. Click the Comparison Programs button to tell SyncBack which programs to use to compare which types of files.
To compare files simply click the file (or files to compare multiple files) and press Ctrl-M, or select Compare from the pop-up menu. You can also configure the double-click action to compare files. If a suitable comparison program is not available for the file type then the files will be opened.
|
Note that the files must be retrieved to the local drive for comparison. If you have large files on FTP servers, or slow networks, then there may be a delay while retrieving the files. |
Opening Files
To open (view) a file simply click the file (or files to compare multiple files) and press Ctrl-O, or select Open from the pop-up menu. You can also configure the double-click action to open files.
To preview a file simply click the file to select it and press Ctrl-V. File previews are not possible for remote locations, e.g. FTP, cloud, etc.
You can also drag & drop files from the Differences window onto your Windows desktop, for example. Click on the file, keep the left-mouse button pressed, drag it to your desktop, and release the mouse button.
|
Note that the files must be retrieved to the local drive to be opened. If you have large files on FTP servers, or slow networks, then there may be a delay while retrieving the files. |
Collisions
A "collision" is when a file in the source and destination differ, yet have the same name. That is, the file is both in the source and destination but is modified in some way, perhaps by date, size, etc.
A notification of collisions occur in the "Differences" window which appears by default when making a backup (note however there are circumstances when the "Differences" window does not appear, for example when the user has chosen not to show the window):
You can click on the rows to immediately apply a filter. For example, if you click on the Collisions row then the items list will be filtered to only show collisions. Clicking on the "Unchanged" and "Free disk space" columns will do nothing.
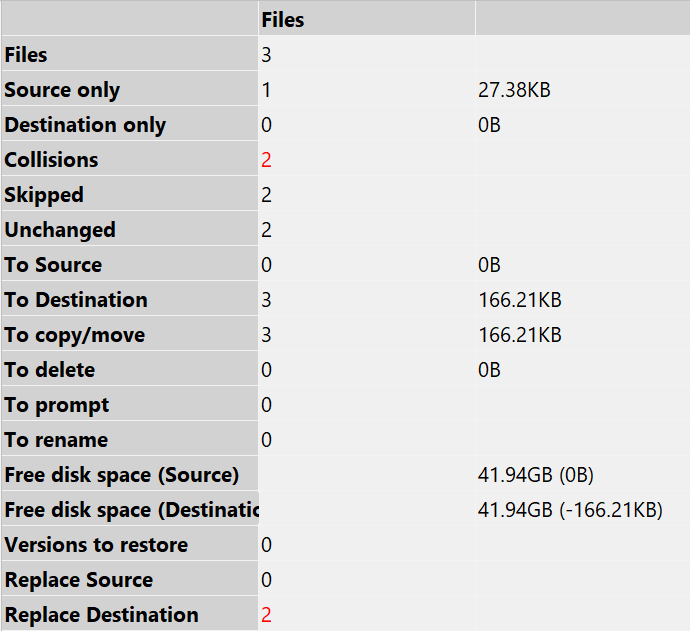
Collisions, and deletions, are shown in red in the "Differences" window to highlight there are going to be changes made when you continue the profile task. If the user views the Differences window carefully, the user has the option to make choices about whether they want to accept the changes SyncBackPro will make, or bypass them with a right click and choose a different action. For more read about the Collision Window.
Free disk space
The free disk space values (shown at the bottom-right of the window) have two values:
•The first value (not in brackets) is the total free disk space (available to the user), plus the amount going to be deleted, less the total being copied to it. For example, if the destination has 4GB free, and 1GB is going to be deleted from it, and 2GB is going to be copied to it, then the free disk space would be 3GB (4 + 1 - 2). Note that this is just an estimation. Also, more space may be required temporarily, e.g. if safe copies are being used. For some locations, e.g. cloud, FTP, MTP, etc., it may not be possible to know how much free disk space is available. If so, a question mark (?) is shown.
•The value in brackets is how much the free disk space value is going to decrease by. For example, if you are copying 5GB to the destination, and deleting 3GB from it, then it would show -2GB, i.e. the free disk space will reduce by 2GB. Again, this is an estimation. This value is useful when the free disk space is unknown.
If you are preserving file hard links, or copying directory symbolic links and junction points, the Differences window will show the links for the selected files or directories, both in the hint (if a hard link) and in the details at the bottom-left of the window:
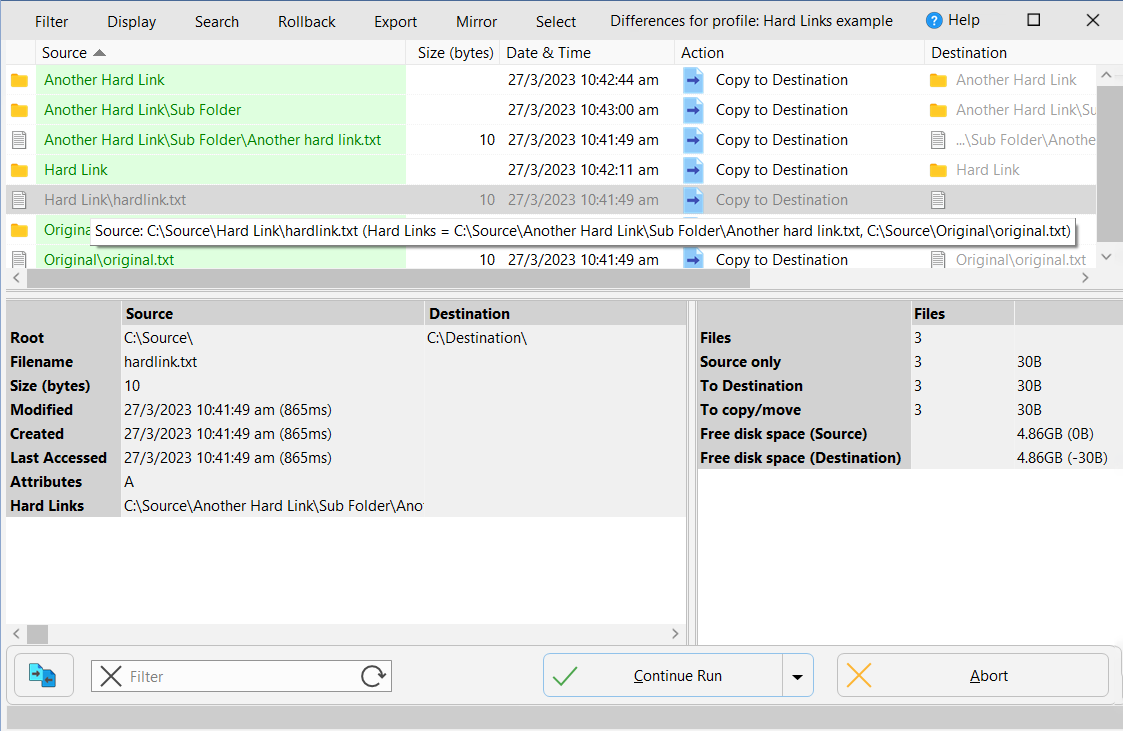
Keep in mind that hard links to files outside of the base folder are not shown. See the Links section for details.
The file attributes are:
A |
Archive |
a |
Recall on data access |
b |
Block device (Linux) |
c |
Character device (Linux) |
C |
Compressed |
d |
Device (Linux) |
D |
Directory |
E |
Encrypted |
H |
Hidden |
I |
Not content indexed |
J |
Junction point |
l |
Symbolic link (Linux) |
N |
Normal |
O |
Offline |
p |
Pinned (Windows) or named pipe (Linux) |
P |
Sparse |
R |
Read only |
s |
Socket (Linux) |
S |
System |
T |
Temporary |
u |
Unpinned |
V |
Integrity Stream |
v |
Virtual (Linux) |
W |
Whiteout |
X |
No scrub data |
For FTP, it may be in rwx format, i.e. read, write, execute, with the first group of three letters referring to the owner, next is the group and finally others (users).
All Content: 2BrightSparks Pte Ltd © 2003-2026